Golf Simulator Impact Screens: Replacement golf simulator screens are made to order from one of three impact-mesh options. The 3-ply HD material adds a foam interior layer for lower transparency, noise reduction and quick recovery.
Choose your material
Standard Golf Mesh is great for impact screens where image quality is less important.
HD Golf Mesh delivers improved images, especially when black material is draped behind the screen.
HD 3-Ply material offers the best image quality and improved noise reduction.
Decide on fasteners
We recommend choosing a pocket (sleeve) on the top and bottom of the screen to hang it from a bar. This ensures uniform horizontal support. Insert a chain in the lower sleeve to provide slight tension while allowing maximum give. Grommets are recommended on the vertical sides to connect to your frame using ball-bungees.
Size your screen
All three raw materials come in 120-inch fabric widths, which means one dimension of your screen should not exceed 120" in order to avoid seams. Grommets and pockets may reduce the maximum size of the constrained dimension. Your projector's aspect ratio and throw ratio are used to calculate your optimal screen dimensions.
Finalize your setup
Consider side panels to close in your "fairway" and contain shanked shots to protect walls, windows and yourself from ricochets. Use solid panels to block external light and improve your picture quality. Use mesh to allow airflow and visibility. See our DIY Golf Simulator Guide for tips on building and sizing your sim room and screen.
Virtual golf simulators are a great way to work on your golf swing all year round. The projection screens used by these systems need to take a lot of abuse. Low quality simulator screens may be cheap to buy but they don’t end up lasting very long. Our high-quality golf simulator impact screens are extremely cost-effective. They are designed to provide years of enjoyment and are made to your exact specifications.
We have three different materials from which to choose. Visit this page to learn more about our golf mesh material.
Below you will find information about sizing and installing your custom golf simulator screens. Follow the links to gain insight into building your golf simulator room and to help ensure that you order the best size of screen for your set up.
HD Golf Mesh (3-Ply)
Three layers with a foam interior. This material offers the best image quality, the quietest impact, and no black backing is needed to render a crisp image.
HD Golf Mesh
Our best single-ply material, with the second-highest image quality. It can be enhanced with a black background behind the screen.
Golf Mesh
Our standard material, made from the same polyester yarn as HD Golf Mesh with a looser weave, so the image is good but less crisp. Add a black background behind the screen for the best picture. See the full comparison on our golf mesh page.
This image shows a comparison of the standard Golf Mesh and the HD Golf Mesh. These screen samples are sitting on a table with some dark wood grain so that you can see that the HD Golf Mesh blocks out more of the dark areas. You can also see that the HD Golf Mesh offers a smoother surface.
Before you order
We recommend reviewing various sections of this website before you place your order. Depending on your situation, follow one of the sections below.
Replacing a Screen
If you are replacing an existing screen, your simplest option is to order a screen in the exact size and finishing of your current screen (assuming you don't want to make any adjustments). Our order screen offers grommets and pockets as fasteners. If your screen uses Velcro, D-rings or some other type of fastener, please contact us, since we can likely finish the screen in the same way as your current screen is finished.
If your grommets need to be precisely aligned with your current screen, please provide a diagram that shows exact grommet positions, measured from left-to-right from one edge as illustrated here.
In addition to the size and finishing, you will need to choose the material for your replacement screen. This will mainly be determined by the image quality and price point you are seeking.
To order this online, use our golf simulator screen order form and enter your required dimensions, pocket sizes and grommet configuration.
Buying Your First Screen
If you are just getting started on setting up your golf sim room, you will want to check out our DIY Golf Simulator Room Guide. This will walk you through all of the components that are typically required and how they will be configured. If you have already built your room and just need the screen, you can concentrate on steps 4 and 5 in the guide where we detail your options for the golf screen finishing and sizing. Be sure to try our interactive calculator which helps size your screen according to your equipment specs.
In addition to the screen itself, we can also make side panels like the ones shown here or even full cages to protect stray balls from damaging your walls or breaking your valuables. These panels can be made from 18 oz vinyl, if you want to block out the maximum light. We can also use 90% block premium mesh, to block some light while allowing airflow or 60% mesh which provides maximum airflow.
If you are already using one of our tarps as an indoor golf simulator screen please send us a note and we will post it on our blog. A nice customer sent us this video of himself using one of our replacement golf simulator screens.
Cleaning Your Simulator Screen
If you find that your screen has become soiled or shows scuff marks, these marks can be lessened by using a Mr. Clean Magic Eraser. Scrub in the direction of the grooves on the screen. Never use a bleach based cleaner on your screen since the bleach will weaken the material.
Removing Fold Creases From a 3-Ply Screen
A 3-ply screen can arrive with fold creases from shipping. A fold is both a crease in the fabric and compression in the foam layer inside, so it takes longer to relax than a crease in a single-ply screen. Hang the screen first, flat with some give and not drum-tight, and leave it hung. Many fold marks relax over a few days, and some take a week or two. Judge the creases only after the screen has hung for a while.
If creases remain, steam the screen with a clean garment steamer and distilled water, on a low setting, holding the nozzle 6 to 12 inches away, never touching, keeping it moving, and letting each section cool and dry under tension. If you do not have a steamer, steam-iron through a clean cloth: lay a bath towel completely smooth and flat on an ironing board, lay the creased area on it, cover it with a clean, non-textured tea towel, and steam-iron on medium heat, keeping the iron in motion without too much focused heat. The ironing temporarily compresses the foam, but the foam reflates over time. If a crease still shows in the projected image after steaming or ironing and a week or two hung, please contact us with a photo of the screen.
Frequently Asked Questions
What makes 3-ply mesh ideal for golf simulator impact screens?
3-ply polyester mesh absorbs high-velocity ball energy quietly with minimal rebound, while providing a smooth white projection surface for 1080p and 4K displays.
How far from a wall should a golf impact screen be installed?
Install the impact screen at least 12 inches away from any back wall to allow fabric deformation upon ball impact without hitting structural surfaces.
How do I tension a replacement golf simulator screen?
Hang the screen on a top pocket over a bar, with side grommets on ball bungees and a weighted bottom pocket, tensioned flat with some give so it flexes on impact.
How can I maximize the lifespan of my impact screen?
The number one cause of premature wear tends to be wedge shots. Using a wedge or high loft iron tends to put a lot of spin on the ball. When a rapidly spinning ball strikes the screen, it can slowly "burn" through the material. When practicing your short game, consider hanging a towel in front of the strike zone to prevent premature wear of your impact screen.
We recommend standing 10 feet back from the screen, and no closer than 8 feet.
Be sure not to tension the screen too much. It should have some "give" upon impact. Using flexible fasteners, like ball bungees, enables a taut screen to release tension when struck.
Use only new, clean, unmarked balls.
Clean your clubs before using them with your impact screen. If your clubs are not completely clean, microscopic bits of dirt or sand can transfer onto the ball and form an abrasive surface that cuts the screen fibers.
Customer Testimonials
Name:
Stan Snider
Location:
Guelph, Ontario
Rating:
Excellent
Comments:
Please share with the team that made my tarp…Love it! I have been sharing your name with everyone😀..
Thanks again, Stan
Editor's Note This review and supplied photo pertain to our 3-ply golf mesh.
Name:
Amir Madady
Location:
Richmond Hill, Ontario
Rating:
Excellent
Comments:
The tarps worked out great, I used them to build a golf simulator at home and now everyone I know wants one 😄. Thank you for all your help.
Photo:
Editor's Note As shown in the photo, we built a "cage" in 90% Super HD mesh to catch errant balls.
Name:
Tyler Stephens
Location:
Saskatoon, Saskatchewan
Rating:
Excellent
Comments:
I had a great experience with heavy duty tarps! I had them make me a custom sized golf simulator impact net/screen. I was able to design is exactly as I wanted it all online, including a quote at the end of the process. Shipping was free because I live in Canada, and I couldn't be happier with the results! If you're thinking about setting up a golf simulator you should check these guys out first. I paid 1/4 the price that I thought I would.
Name:
Brett
Location:
Cochrane, Alberta
Rating:
Excellent
Comments:
I ordered a mesh screen tarp for use with the golf simulator I built. Received the screen on time and it is awesome. Fits perfectly and takes a beating and looks like new. I have hit at least a thousand balls into it, boom perfect. I love that it was made in Canada. It’s certainly helping me through these times.
Name:
Mike Wordell
Location:
Sherwood Park, Alberta
Rating:
Good
Comments:
Purchased this tarp in November to use as a virtual golf screen. Received it about 3 weeks after ordering, which was one week earlier than expected! Tarp/screen came to spec and was easy to put up. The screen cost about $250, which was about $500 less than an actual virtual golf screen from a virtual golf retailer. Screen is a bit see through, so you will need to put a sheet of felt or something behind it. I got felt for $60 or so from local fabric store. After that, looks great!
Name:
Ryan Durocher
Location:
Bracebridge, Ontario
Rating:
Excellent
Comments:
Thanks for the HD Golf Screen and Mesh. It worked out great. Here is a pic for you to use.
Thanks Again, Ryan
Name:
Gaetan Boudreault
Location:
Fall River, Nova Scotia
Rating:
Excellent
Comments:
The tarp has been all and more than we expected, it is perfect as golf impact screen. We have played more than 100 rounds since December 2020, all with real golf balls, and so far there is not a mark or rip on it. It still looks brand new.
Name:
Jason Schraefel Fitted Golf Co
Location:
Edmonton, Alberta
Rating:
Excellent
Comments:
We use the screen for our golf fitting centre. The screen arrived on time and exactly as advertised. We've used it with all sorts of swing speed players and it has performed very well for us.
Name:
Trevor Hardy
Location:
Watrous, Saskatchewan
Rating:
Excellent
Comments:
Awesome customer service. Very knowledgeable, and helpful. Great product! We’ve been using the enclosure screen and love it. Now we don’t have balls bouncing all over the garage. Here is a picture of our finished product. Thanks again for all the support and help.
Here is another photo sent in by Trevor of Watrous, Saskatchewan . Trevor writes "Love the tarp. It was exactly what we requested, and is working flawlessly as the impact screen for our golf simulator."
Once you have checked the room, the build, the material and the launch monitor, order a custom golf simulator screen to your exact size. Minimum order $99.


 Three layers with a foam interior. This material offers the best image quality, the quietest impact, and no black backing is needed to render a crisp image.
 This image shows a comparison of the standard Golf Mesh and the HD Golf Mesh. These screen samples are sitting on a table with some dark wood grain so that you can see that the HD Golf Mesh blocks out more of the dark areas. You can also see that the HD Golf Mesh offers a smoother surface.
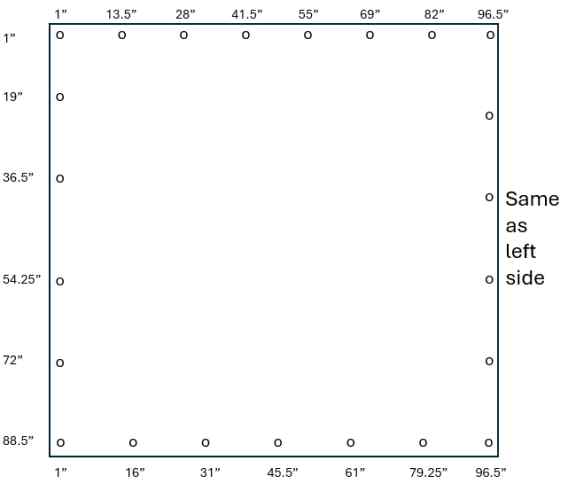 If your grommets need to be precisely aligned with your current screen, please provide a diagram that shows exact grommet positions, measured from left-to-right from one edge as illustrated here.
 In addition to the screen itself, we can also make side panels like the ones shown here or even full cages to protect stray balls from damaging your walls or breaking your valuables. These panels can be made from 18 oz vinyl, if you want to block out the maximum light. We can also use 90% block premium mesh, to block some light while allowing airflow or 60% mesh which provides maximum airflow.

 Please share with the team that made my tarp…Love it! I have been sharing your name with everyone😀..
 Editor's Note

 Thanks for the HD Golf Screen and Mesh. It worked out great. Here is a pic for you to use.
 Awesome customer service. Very knowledgeable, and helpful. Great product! We’ve been using the enclosure screen and love it. Now we don’t have balls bouncing all over the garage. Here is a picture of our finished product. Thanks again for all the support and help.
 . Trevor writes "Love the tarp. It was exactly what we requested, and is working flawlessly as the impact screen for our golf simulator."