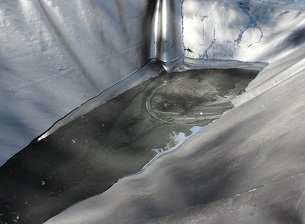
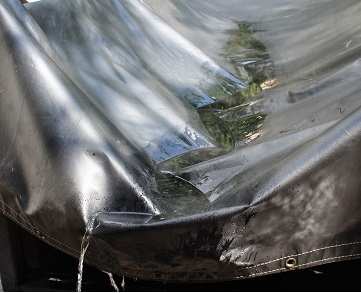
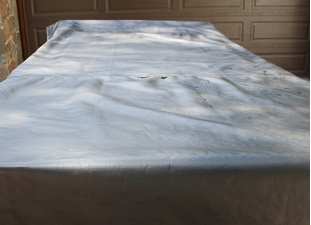
 One of the common problems when tarping utility trailers is that water can collect inside the tarp. If the top of your trailer is open, no amount of tightening will prevent this from happening. This won't necessarily damage the tarp but if the water sits there for a while it will start to get rancid and slimy. The weight of the water will also put stress on the grommets and trailer fasteners. If the water freezes, it could also expand and cause structural problems with the trailer or be too heavy to remove.
There are a couple of common strategies for preventing water from pooling.
If your trailer is open at one end, or if you can remove the tailgate to open up one side you could loosen the tarp at the open end in order to form a channel to allow rain water to run off. If you are planning to use this technique, make sure you order your tarp a little bit wider than you would otherwise so that there is enough extra material to make a proper channel.
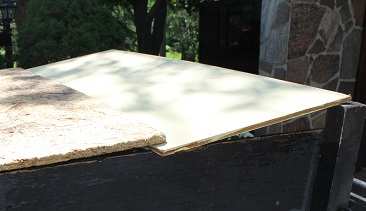
Another option is to use boards (planks, plywood, etc.) to prevent the tarp from sagging into the trailer opening. In the example shown here, the back of the trailer is a little taller than the sides so we angle the last board so that it lines up with the back.
You could use one large piece of plywood on top but you might find that this is kind of heavy and awkward. It may be more convenient to use several smaller planks or even 1" x 6" planks instead.
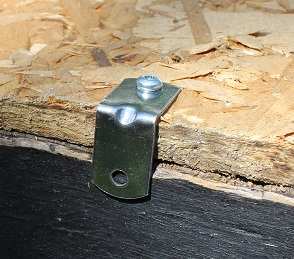 Obviously these boards will need to be wider than the sides of the trailer so they don't fall in. Nevertheless, you don't want them to be too wide so you might consider adding angle brackets or some other form of clips on the edge of the boards to prevent them from falling into the trailer.
 Once you have a solid surface on top of your trailer you can add your tarp and tie it down to prevent the wind from blowing it off. The rainwater should nicely flow off the sides.
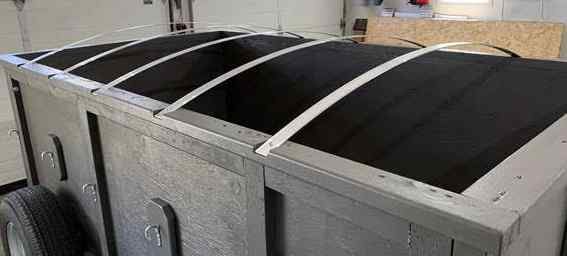 Another potential solution is to arc the top of the trailer by adding bows so that rain water runs off to the sides. If you go with this option you should have a bow about every 18 inches or so in order to prevent water from collecting between the bows. Bows can be made of metal ribs like the ones shown here or thin wood slats, copper piping or even PVC piping.
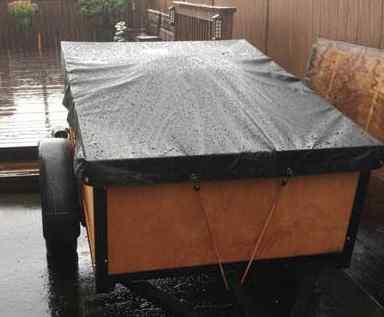
These bows are not so tall that the tarp needed to be adapted for the bows but tall enough to ensure water run off. Keeping the tarp taunt will also help to ensure the water runs off to the sides.  Here is a photo of the same trailer after installing a fitted tarp with 8 inch sides.
Be sure to keep in mind that raising the center of the tarp will cause the sides to be drawn in. This means that the tarp may need to be several inches longer and wider than your trailer in order for it to fit when the center is elevated. To figure this out we will assume that the trailer top is in the form of a triangle rather than the arc formed by the supporting bows. Then we call upon a little bit of high school Euclidean geometry. In 500 BC the Greek philosopher Pythagoras determined that the length of the longest side of a right angle triangle is equal to the square root of the sum of the other two sides. This can help us calculate the distance of the tarp across the top vs. the sides as we show here.
 Let's suppose our trailer is 4 feet wide, this would make B=2 feet (or 24 inches) and we want to elevate the center by 6 inches so H=6. Then we can use the formula
H2 + B2 = L2 or
62 + 242 = L2
36 + 576 = L2
L = SquareRoot(612)
L = 24 3/4 (approx.)
Since this is just one side of the tarp, the full width of the tarp across the top would be at least 49 1/2 inches. We can say at least since we know that the shortest distance between any two points is a straight line. Since the arc of the bows is in fact a curved line we should likely add 1/2 inch or so to allow for this. Next we should add another inch to allow for some tolerance and to make it easier to install and remove the tarp. So, in this example, if the width of the trailer is 48 inches, we would need to make the tarp width about 51 inches to accommodate the increased height and tolerance.
Notice that the shape of the tarp in the lengthwise direction is not similar to a triangle but more like a trapezoid. Therefore, going in the other direction you would assume a shape similar to the following to calculate the correct length.
 In this case the base width would be the distance to the first rib on each end. Let's say that is 18 inches so our formula would be 62 + 182 = L2 and L would be about 19 inches. In such a case we would need to add 2 inches to the length to allow for the raised height and another inch for some tolerance.
If your trailer is not too large, you might be able to do something like one of our customers from Portland Oregon. James writes:
"I received my cover for my utility trailer. It fits great. Slightly large by design. I spent a lot of time trying to find the best way to keep rain from pooling and thought you might get a kick out of my simple solution. I bought a 32 gallon Rubbermaid waste can for $15 at Home Depot. I placed it right in the middle of my trailer. With the domed top it works perfectly."
As James noted, you won't be able to raise the center of a fitted tarp without drawing in the sides. Therefore you will want to make the length and width a little bigger than the sides of your trailer to allow for the pitch you are going for. You will also need to make sure the bottom of the sides is pulled tight so that the top of the tarp stays taunt. The trailer shown here is about 4 feet x 6 feet. If it was much longer than this you would likely need to go with two or more trash bins to prevent sagging and water pooling. Obviously the height of the bin is important as well since you will need it to be several inches taller than the sides of the trailer to create a proper slope. You can always raise the height by putting boards under it if necessary.
Here are the photos sent in by James. The photo on the right was taken during a good rain and yet there are no signs of water pooling.

One of our customers from Seattle Washington, who is a retired sheet metal worker, sent us these photos showing how he constructed a nice flat surface out of sheet metal to prevent water from pooling. First he formed six panels using 20 gauge galvanised sheet metal. Bending them in this manner is necessary to make the metal more load bearing. Notice the exposed lip at the end of the panel, this will rest on top of the side of the trailer once this panel is flipped over.

Here we see the six panels in place forming a nice flat surface that will prevent water from pooling. I would not recommend this sheet metal option if you plan to use the enclosure while travelling since the sharp metal panels would be a safety issue if you were ever in an accident.

Another simple design that works well involves elevating the center of the tarp along the length of the trailer. Here is an example of a simple support made from 2 x 2 boards that works well. You will need to make sure that the center is raised enough to ensure that rain water sheds. For this 4 foot wide trailer I raised the support board so that it is about 14 inches higher than the sides of the trailer. For this height you would need to add about 8 inches to the width of the tarp.

You will also need to add another 2 1/2 feet or so to the length of the tarp so that you can fold the tarp down on the ends like we show here.

